Seat Cover Jim’s

Trying to pick the seat upholstery for Mavis is like choosing one outfit to wear every day for the rest of your life.  Dramatic, I know, but unless you’re Steve Jobs or don’t give a shit, that would suck.  Currently, Mavis is donning the equivalent of a wallflower’s dress that’s been dragged through the dirt.

dscf1144

I liked the idea of finding the fabric first, then basing the car color on that.  I knew that I was leaning towards green, so after seeing this phenomenal fabric in a ’75 Maverick, I was determined to find it.

greenfabric

My dream fabric!  The original from 1975.

You can see how Ford was going for that Western feel with the Native American blanket like fabric and of course, naming the car ‘Maverick’, like the wild beast that it is.  In fact, this ad from 1970 really drives this vibe home.

70brochure

But then there’s this…a bit confusing, but good to know that this car will get me to and from my dive trips to the lake…with a little more jazz.

scubamav

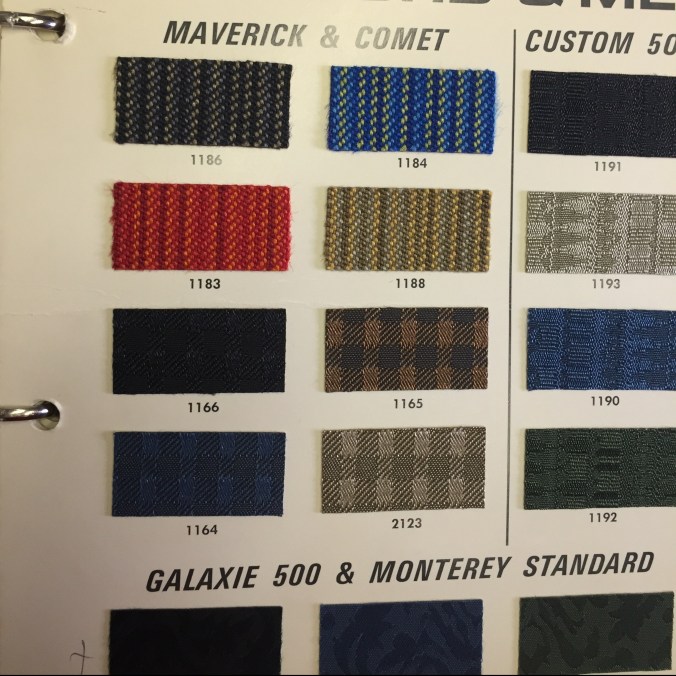
There’s an auto upholstery shop in Denver that had book after book of amazing Ford fabrics throughout the ’70’s.  I think I spent about 2 hours pouring over swatches in their back room.  There was a possibility of ordering some of these vintage fabrics!

img_1449.jpg

I looked at fuzzy stuff…too itchy:

IMG_1438

Knitted vinyl anyone?  Without AC in the car, this option seemed a bit ‘sweaty’ if you get my drift:

IMG_1446

I even found Mavis’s original sad sad fabric, #2123 below:

img_1434.jpg

Then I found it…the original fabric from the ’75 Mav I fell in love with, swatch number 512.

IMG_1444

The owner of the shop boasted the whole time about his connections and how he had a line on vintage fabrics.  When I showed him this he said, “Yeah, but not that one.”  Anyway, if he had been able to get his hands on it, it would have run me about $300 a yard.  I’d determined I needed about 5 yards, so this was a no-go, but it was already a no-go because I couldn’t fucking find it.  At this point, I’d fallen for the green stripe look, so I carried on, searching for another green striped fabric in my price range.

Over a year ago, in Kentucky, Pop and I had found a third generation upholstery operation called, appropriately, Seat Cover Jim’s.  Now Jim is a good guy, as was his father Jim and I can only assume the same for his grandfather, Jim.  I liked their sign, it leaves nothing to the imagination.

img_2337

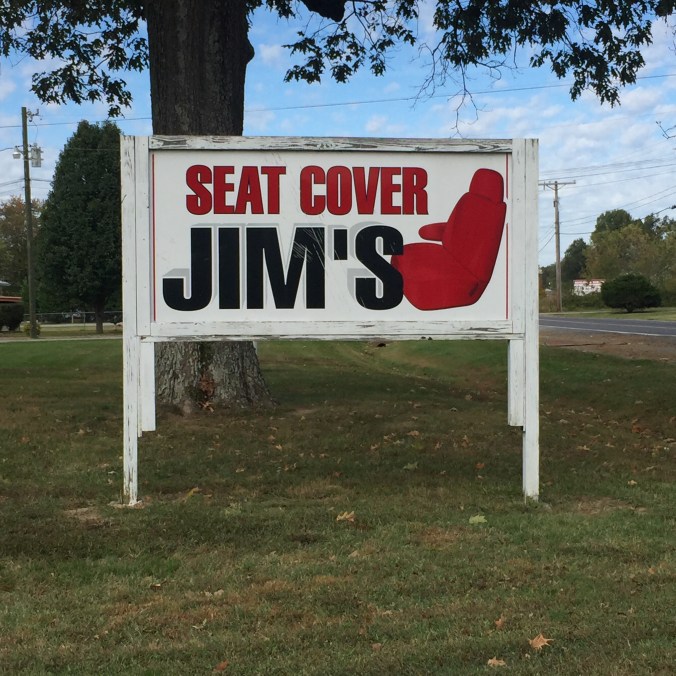
When we first met Jim, he thought that maybe grandpa had a stash of that amazing ’75 fabric tucked away in his warehouse.  Now Jim could not be a nicer guy, but he is the epitome of the concept that everything goes a little slower down south.  Momma and Pop call it, “Kentucky Time.”  I think I waited an agonizing 4 months before he actually walked over to the warehouse to look for the fabric, only to tell me he didn’t have it.   But can you blame him?  Look at the thing!

img_2339

But Seat Cover Jim did come through for me in the long run.  He found a beautiful, affordable, green striped upholstery fabric that I really liked.  He ordered it, I waited over a year, then my seats were done!  I’m giving Jim a hard time, but the reality is that I’m not close to being done with the car and the seats are really the last thing I’ll install.  He probably could have dragged it out another year or so.  But, without further ado….the seats.  Aren’t they pretty!!??

img_3350.jpeg

Seat Cover Jim III did a beautiful job and has been nothing but kind throughout the whole project.  Thank you, Seat Cover Jim, for being a part of Mavis’ rebirth.  And if anyone is on “Kentucky Time”, it’s me, as July was the start of the 4th year since I first felt the tickle of Mavis in my para menopausal womb.  But, things are speeding up! As of this writing, Mavis has received her rockin’ 6- banger and we’re hoping to start her up next visit!  Yes, you heard me right.  Stay tuned and much love!

img_2534.jpg

Me with Jim, son of Jim, son of Jim.

Get Your Rear end Up!

Mavis has her rear end up, almost.  It’s so great to be able to start putting parts and pieces back on the car rather than taking them off.  So when I say ‘rear end’ I’m referring to the gas tank, back axles, differential, leaf springs, shocks, drum brakes and parking brake.  We also got the brake lines and gas line connected.  This picture doesn’t really do it justice, but here is the finished product of a shit ton of work.

IMG_2542

First thing up was the gas tank.  Those two long bolts can be shortened, but all that is covered by the back bumper eventually.  We also got the front of the leaf springs up and they lay in waiting for the differential assembly.

IMG_2461

We ended up keeping our original axles, but bought new bearings and had to get those pressed on.  Curt to the rescue!  We went over to his garage where he cut the old ones off (the ONLY way to get them off) and used his 40 ton press to press the new ones on.  He did the first one and let me do the second.  This machine is quite intimidating, you can crush things in it!  On approach, it looked like an industrial guillotine.

IMG_2419

Curt showed me how to place the axle with the new bearing. Here’s how it looks all ready to be pressed.

IMG_2421

Of course, me being who I am, decide I was going to be concerned that with all the pressure, the bearing may go on crooked.  I find things to be worried about, you see.  Here I’ve never done this myself nor seen it done and I’m telling a long-time veteran mechanic not to “put it on crooked”.  So, I deserved this.  Perhaps that’s why Curt wouldn’t accept any money for his work, because giving me shit was more satisfying.


Bearings, pressed and ready.

IMG_2427

Back at Woody’s Garage we carried on.  Backing plate on, axles inserted, brake cylinder attached and brake lines in.


Pop says, “We’re a fucking machine shop!”  As much as you can call cutting screws shorter and rethreading them ‘machining’ things.  But we did have to come up with a solution to a brake line issue we had.  The main line was still in good shape (the line that brings the brake fluid from the master cylinder in the front of the car back to the axle.)  Where that line splits into two, we had to order.  Miraculously they fit, but for just a few modifications we made with a tube bender.  What didn’t fit were the fittings that connect them to the junction block where they split off.  BUT – the ones that were on the $100 piece of metal (the unusable axle we bought from Mustang Marty Miller) did.  Yes!  One less trip to the parts store!  We cut off just the tip of the ends, replaced the fittings and reflared the tubing.

IMG_2443

To do this, we had to use a special flare tool.  I don’t understand how Pop continues to come up with a tool for EVERYTHING.  We’ll run into a problem or a need for something very specific and his eyes get all big and his mouth says, “ooh” without any sound.  He puts his gorilla finger up in a ‘wait a minute’ sort of way and says, “I have just the thing.”  Then he rummages through the garage and comes back with the perfect tool to get the job done.  I think he’s jacked to be able to use what 60 years of tool gathering gets you.  It is pretty awesome.

IMG_2442

Flare tool, happy to be used.

Next up, getting the differential housing attached to the springs, the back end of the springs up and add shocks.  So here’s a big admission.  I didn’t know that the axle sits on the leaf springs.  I can’t say I knew how it was attached to the car at all.  I can’t even say I pondered this at any point during this project so far.  So when that concept clicked in my mind and I had that Aha! moment, Pop just looked at me and said, “How did you think it connected to the car? Did this not occur to you when we disassemble it?”  Again, I hadn’t really thought about it.  I was like, “What’ev.”

IMG_2464

We used the jack to hold the axle in place while we set it on the springs, secured the axle on the springs with u-bolts then raised the back of them and connected.  Who knew?!

Next, shocks.  One of the parts that must be bought new because they lose their gas and their ability to dampen motion, or in my terms, their ‘puffiness’.  Quick trip to O’Reilly and boom, new shocks.  It’s always exciting to get a new part…here’s me coddling $60 worth of shocks on the way home.

IMG_2387

One of the final steps was getting the brakes assembled. These are the second set of drum brakes I’ve done, as we had to put the Firebird’s back together to get it on its wheels and out of the garage at the very beginning of this project.  Still though, Pop and I had to dodge a couple errant springs.  We have the tool for getting them on, but not off.  So we work together with a screwdriver and pliers and wait to see who’s going to lose an eye.

IMG_2472

Although this all sounds like a lot of work, and it was, we still had time to fart around a bit.  Curt put Lil’ Big Rig up for auction so we went to that and watched him say goodbye to his baby.  We also took the opportunity to get under any 60’s Ford we saw to check out the parking brake system (which we also finished on Mavis.)  So everyone is walking around looking at these beautiful cars and Pop and I are like this most the time…

IMG_2484

Curt got close to what he wanted for Lil’ and it was the star of the show as it’s quite the site.  All chromed up and shiny.  Pop kept saying that someone should buy it to pull their 5th wheel camper with but I think it looks more like something a Country Santa with a cowboy hat would ride down Main Street in a Christmas Parade.  Well, we all felt for Curt as he had a lot of hours and TLC into that truck.  Couldn’t have been easy to see it go…but then he texted Pop a pic of a 1932 Ford Victoria kit he bought the day after.  Curt’s moved on.

IMG_2647

Lil’ Big Rig

Momma, Pop and I also went to a car show in Somerset, KY where I got to meet Tony, the fine gentleman who donated a hood latch to our cause when he and Pop met at the Maverick/Comet gathering last summer.  What a great guy.  He asked me what it was about the Maverick that made me choose it for the project.  When I said that I just loved the shape of it, that it is a beautifully balanced little car, I think he teared up before hugging me.  Tony was at the show with Lemonade, his beautiful, supercharged 302 Mav, which Pop says is a ‘truly dangerous vehicle’ (in a good way.)  Afterward we followed him back to his garage where he literally, has Mavericks STACKED.

IMG_2356

IMG_2378

So, great last trip.  Lot’s of work, lot’s of fun and now the holidays hit. Next up on Pop my Ride, Mavis’s front end, disc brakes and more adventures.

Wax On Wax Off

Pop’s got a lot of old gear head buddies which is a great thing because not only do we have a line on parts, information, where to get our upholstery done or engine bored, but we have access to skill sets that are invaluable.  Pop’s friend Curt is a fellow bad ass and an excellent mechanic who knows how to paint cars.

img_9366

Curt in his garage.

For the first four days in Kentucky we helped Curt strip, sand, prime and paint his wife’s car.  Yes, I had driven almost 1,500 miles to work on my car and painting a car is usually the last thing you do when rebuilding, but you have to grab these opportunities to learn when you can.  Besides, it was cool to meet a friend of Pop’s and Curt is a great guy who shares my affinity for the f-bomb.  Smaller in stature but strong, Curt has a slow, thick drawl and peppers his speech with sayings that crack me up.  “Well, shit the bed Fred,” was one of my favorites but it was even funnier when I thought he was saying, “Well, shit the bedspread.”  I’ll be adapting that one for myself.  Neither Pop nor Curt can hear that well and with paint masks on, compressors popping off and fans blowing, there was a lot of “WHAT?!” going on.  Curt would yell something unintelligible while spraying and Pop and I would just look at each other and shrug.

But we understood enough to learn a great deal about painting a car.  Curt’s wife Lori is a mail carrier and in these smaller towns you use your personal car to deliver.  Her white Dodge ‘Casper’ was a good car whose exterior had seen better days and Curt was taking the week to focus on the project.  The first step was to scrape any loose paint off the car which pleased me greatly.  I LOVE stuff like this.  Remove paint and stain from an old piece of furniture?  No problem.  Help you strip wallpaper?  Don’t mind if I do.  Detail clean something with a toothbrush?  Yes please.

Scrape, wet sand, tape and prime.  According to Curt I am an excellent taper, which is a good thing because after you prime, you pull the tape, wet sand again and re-tape the whole thing for the base coat.  We put on two base coats, which is the color coat, then two top coats which is the gloss.

I say ‘we’, but Curt did the spraying.  He let me try a little bit on the primer and apparently I wasn’t aggressive enough.  I think I put more paint in the air than on the car.  Pop and I are planning on painting both his Firebird and the Mav eventually.  I’m going to help him set up a paint booth in his garage and he’s already done a little spraying on his wheels.  I just can’t imagine spending weeks sanding and smoothing the car and then fucking it up within two minutes of painting it.  These are things to worry about down the road though.  I told Pop we’ll just practice on his car.

Curt’s garage was filled with all sorts of toys, current and of yesteryears.  The most recent pride and joy was Lil’ Big Rig.  Lil’ Big Rig (and it must be pronounced as such) was a 1992 Dodge D250 chassis with a ’96 model Peterbuilt cab and a ’98 Dodge dually bed.

img_9340

Curt also rebuilt a 1950 FLH 1200 Harley Davidson pan shovel with a 1950 model front end and he thinks the frame was 1960 something.

img_9367

Most exciting to me though, behind the garage, in a shed the American Pickers would consider a sweet, sweet honey hole, Curt had an 1967 BSA.   Brother Mathew, I have found your motorbike.  We just need to get Curt to sell it to us and we’ll fix it up.  Done!

img_9378

Toys aside, Pop and I were good students and learned a great deal.  Curt ended up with a painted car and I ended up with a new friend.  Lori was thrilled and Curt was obviously proud to have been able to do this for his little lady.

img_9432

Curt and Lori with Casper, refreshed.

So, onward to the Mav, right?  Wrong.  Back at the P’s the Bird was still taking up space in the garage, up on stands with no back brakes or wheels.  Pop had worked hard, but there were still more things to do to be able to move it. I’m jonesing to work on the Mav and here I’m sanding, polishing, scraping and observing instead!


I’m like, you gotta be karate kidding me.  These two old farts have been giving me the ol’ wax on wax off treatment!  But, here’s what I also did in the remaining days of that first week.  I learned how to put a gas tank on (then take it back off and put it back on), put together drum brakes, pull apart those same drum brakes and then put them together correctly, bleed brake lines and diagnose brake issues which led to replacing a master cylinder.  I can now jack an entire car up and get it on stands, take wheels off and put them on and put a car on rollers to move around a garage.  I learned a lot of the tools needed to be able to grab a 3/8 inch drive ratchet with a 6 inch extension and 1/2 inch socket when asked and how to use an impact wrench.  So when we did get the Bird on the ground and started (first try) after 6 years on stands, I was feeling pretty darn good and more than excited to get started on the Mav in week two.

img_9487

Pop’s garage.  Firebird on stands, Mav waiting patiently.