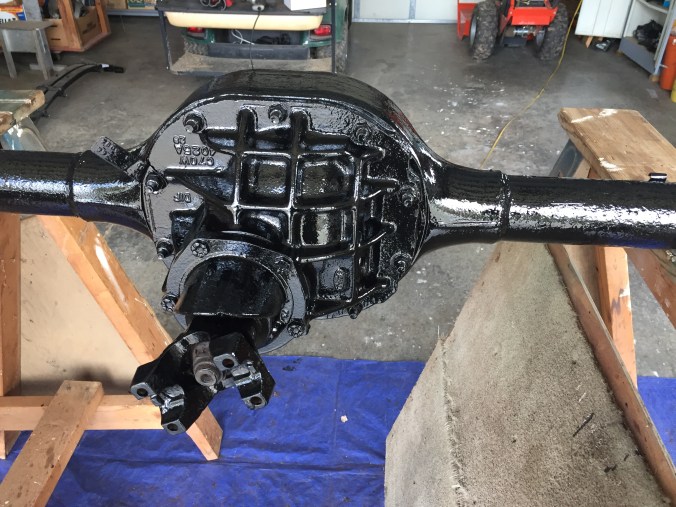
Mavis has her rear end up, almost. It’s so great to be able to start putting parts and pieces back on the car rather than taking them off. So when I say ‘rear end’ I’m referring to the gas tank, back axles, differential, leaf springs, shocks, drum brakes and parking brake. We also got the brake lines and gas line connected. This picture doesn’t really do it justice, but here is the finished product of a shit ton of work.

First thing up was the gas tank. Those two long bolts can be shortened, but all that is covered by the back bumper eventually. We also got the front of the leaf springs up and they lay in waiting for the differential assembly.

We ended up keeping our original axles, but bought new bearings and had to get those pressed on. Curt to the rescue! We went over to his garage where he cut the old ones off (the ONLY way to get them off) and used his 40 ton press to press the new ones on. He did the first one and let me do the second. This machine is quite intimidating, you can crush things in it! On approach, it looked like an industrial guillotine.

Curt showed me how to place the axle with the new bearing. Here’s how it looks all ready to be pressed.

Of course, me being who I am, decide I was going to be concerned that with all the pressure, the bearing may go on crooked. I find things to be worried about, you see. Here I’ve never done this myself nor seen it done and I’m telling a long-time veteran mechanic not to “put it on crooked”. So, I deserved this. Perhaps that’s why Curt wouldn’t accept any money for his work, because giving me shit was more satisfying.
Bearings, pressed and ready.

Back at Woody’s Garage we carried on. Backing plate on, axles inserted, brake cylinder attached and brake lines in.


Pop says, “We’re a fucking machine shop!” As much as you can call cutting screws shorter and rethreading them ‘machining’ things. But we did have to come up with a solution to a brake line issue we had. The main line was still in good shape (the line that brings the brake fluid from the master cylinder in the front of the car back to the axle.) Where that line splits into two, we had to order. Miraculously they fit, but for just a few modifications we made with a tube bender. What didn’t fit were the fittings that connect them to the junction block where they split off. BUT – the ones that were on the $100 piece of metal (the unusable axle we bought from Mustang Marty Miller) did. Yes! One less trip to the parts store! We cut off just the tip of the ends, replaced the fittings and reflared the tubing.

To do this, we had to use a special flare tool. I don’t understand how Pop continues to come up with a tool for EVERYTHING. We’ll run into a problem or a need for something very specific and his eyes get all big and his mouth says, “ooh” without any sound. He puts his gorilla finger up in a ‘wait a minute’ sort of way and says, “I have just the thing.” Then he rummages through the garage and comes back with the perfect tool to get the job done. I think he’s jacked to be able to use what 60 years of tool gathering gets you. It is pretty awesome.

Flare tool, happy to be used.
Next up, getting the differential housing attached to the springs, the back end of the springs up and add shocks. So here’s a big admission. I didn’t know that the axle sits on the leaf springs. I can’t say I knew how it was attached to the car at all. I can’t even say I pondered this at any point during this project so far. So when that concept clicked in my mind and I had that Aha! moment, Pop just looked at me and said, “How did you think it connected to the car? Did this not occur to you when we disassemble it?” Again, I hadn’t really thought about it. I was like, “What’ev.”

We used the jack to hold the axle in place while we set it on the springs, secured the axle on the springs with u-bolts then raised the back of them and connected. Who knew?!
Next, shocks. One of the parts that must be bought new because they lose their gas and their ability to dampen motion, or in my terms, their ‘puffiness’. Quick trip to O’Reilly and boom, new shocks. It’s always exciting to get a new part…here’s me coddling $60 worth of shocks on the way home.

One of the final steps was getting the brakes assembled. These are the second set of drum brakes I’ve done, as we had to put the Firebird’s back together to get it on its wheels and out of the garage at the very beginning of this project. Still though, Pop and I had to dodge a couple errant springs. We have the tool for getting them on, but not off. So we work together with a screwdriver and pliers and wait to see who’s going to lose an eye.

Although this all sounds like a lot of work, and it was, we still had time to fart around a bit. Curt put Lil’ Big Rig up for auction so we went to that and watched him say goodbye to his baby. We also took the opportunity to get under any 60’s Ford we saw to check out the parking brake system (which we also finished on Mavis.) So everyone is walking around looking at these beautiful cars and Pop and I are like this most the time…

Curt got close to what he wanted for Lil’ and it was the star of the show as it’s quite the site. All chromed up and shiny. Pop kept saying that someone should buy it to pull their 5th wheel camper with but I think it looks more like something a Country Santa with a cowboy hat would ride down Main Street in a Christmas Parade. Well, we all felt for Curt as he had a lot of hours and TLC into that truck. Couldn’t have been easy to see it go…but then he texted Pop a pic of a 1932 Ford Victoria kit he bought the day after. Curt’s moved on.

Lil’ Big Rig
Momma, Pop and I also went to a car show in Somerset, KY where I got to meet Tony, the fine gentleman who donated a hood latch to our cause when he and Pop met at the Maverick/Comet gathering last summer. What a great guy. He asked me what it was about the Maverick that made me choose it for the project. When I said that I just loved the shape of it, that it is a beautifully balanced little car, I think he teared up before hugging me. Tony was at the show with Lemonade, his beautiful, supercharged 302 Mav, which Pop says is a ‘truly dangerous vehicle’ (in a good way.) Afterward we followed him back to his garage where he literally, has Mavericks STACKED.


So, great last trip. Lot’s of work, lot’s of fun and now the holidays hit. Next up on Pop my Ride, Mavis’s front end, disc brakes and more adventures.